- Processing a Transcript Request in SDB
- Printing an Official Transcript
- Printing an Unofficial Transcript
- Microfilm transcript requests
1. Processing a Transcript Request in SDB
Current students, former students and alumni – including those with records on Microfilm – place orders for official transcripts through our third-party vendor, Parchment. Transcript orders should not be taken in person, via email, phone, or by fax. All requests for official transcripts should be directed to our website to review instructions on ordering their transcripts via Parchment.
However, there may be times when transcripts may need to be printed by someone in our office for internal purposes or for federal investigators completing background checks.
- Printing an Official Transcript
- Proceed to the SRF 355 Screen (or SRT 355 if already in a student’s record)
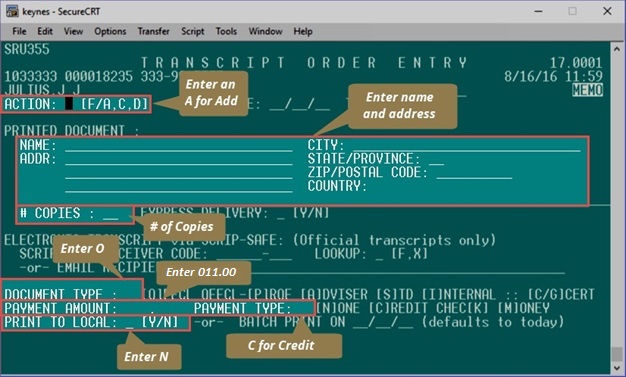
- ACTION: Enter “A” (Add)
- NAME:
- Type “S” if sending to the student, this will populate student name. Check if they have a current last name that is different than the one listed in SDB, if they do, type out new name, do not use S.
- If sending to organization other than student, okay to abbreviate if it doesn’t fit on lines or use multiple lines for name and office etc.
- ADDR: Type the delivery address, can leave city, state, zip blank, just use left lines
- If International, must type Country name
- If campus address, must have Box ######. The building, city, state, and zip no required
- # COPIES: Leave blank if there is only one requested copy. Otherwise, enter the number of request copies
- DOCUMENT TYPE: Enter “O”(letter) for the official transcript
- Enter “P” for professional and graduate work only [ie. Student attended for both Undergraduate & Graduate/Professional School, but does not need the Undergraduate coursework listed]
- No payment type should be entered as we should not be processing transcript requests or accepting money for official transcripts in our office.
- PRINT TO LOCAL: enter Y, and press Send (Outside Enter Key) to print
- For Unofficial Transcripts:
- Current students and Alumni can view and print their unofficial transcript via MyUW, unless their record is on Microfilm, in which case proceed to the Microfilm processing section of this procedure.
- Unofficial transcripts are only printed at our window for Third Party Requestors (ie. FBI, Government Agency Investigators)
- View the investigator’s ID and ensure that they have a signed release from the student
- They will usually ask you if you’re aware of the Privacy Act of 1974, or give a short statement about it.
- Please keep the signed release (occasionally you may have to make a copy) and stamp it with the date stamp and write the student number on the top of it.
- There is a labeled box in the lower cabinet that is in between the first two windows; Please place the release on the top of the stack.
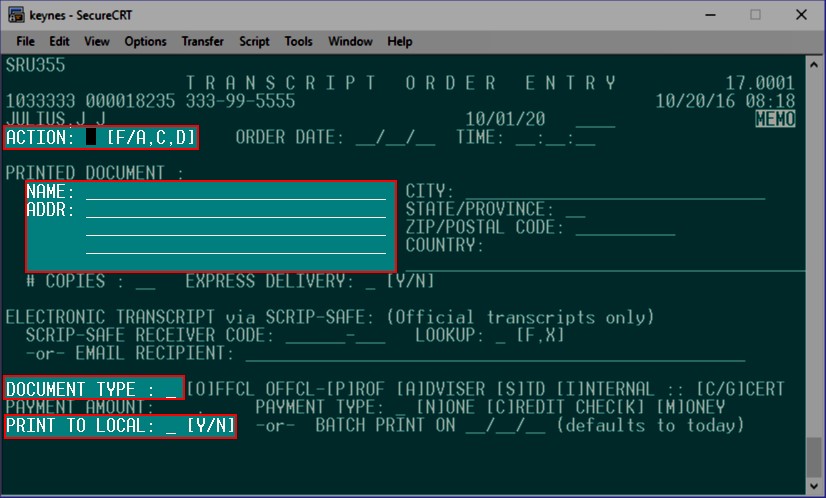
- Navigate to SDB screen SRF 355 Transcript Order Entry
- Enter A in the Action field
- Enter Investigator’s name/Office under NAME field
- Organization on the first line
- Investigator’s name on the 2nd line
- Enter WC for will call in the address field to show it was picked up in person.
- Enter S for Document Type
- Enter Y for Print to Local field
- Ensure that unofficial paper is in printer.
- The requester will ask for your name and title. Sometimes they also ask questions about the quarter system or full time/part time status & how many credits constitute FT or PT, so be prepared to give them this information if necessary.
2. Microfilm Transcript Requests
- Looking up requests on Microfilm
-
- Open Microsoft Access database file “uwTRANS”
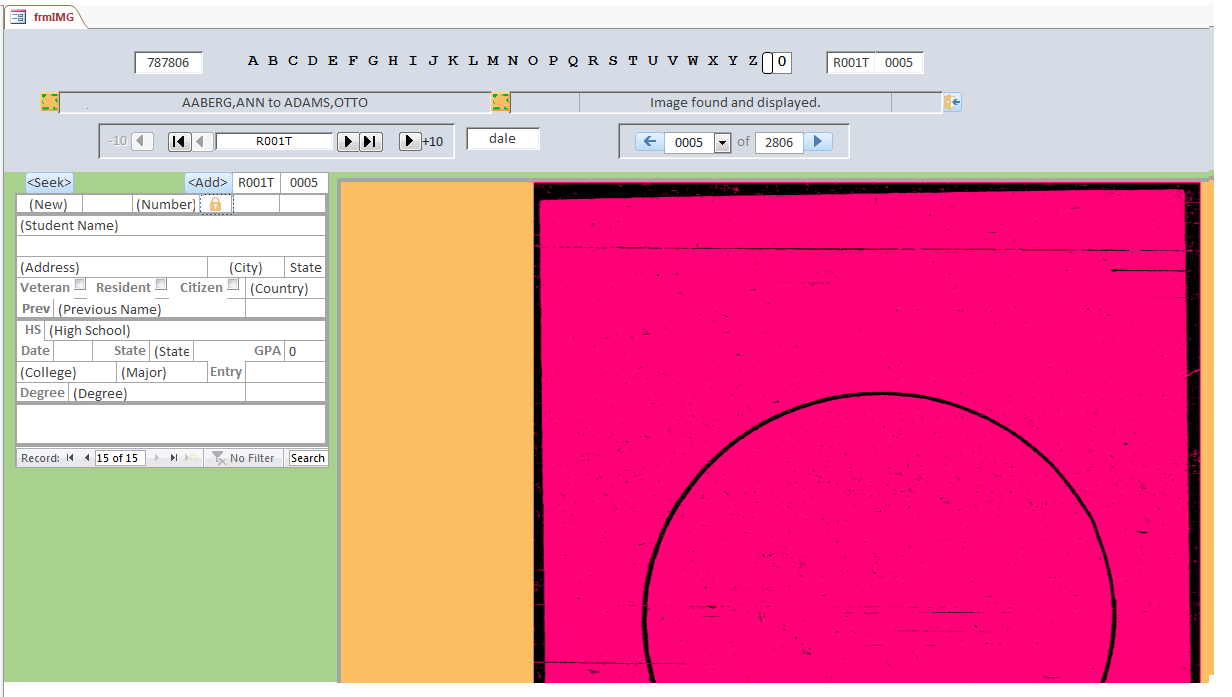
- You can click directly on a letter, A-Z, to search for a digitized reel that corresponds with the last name of the student who has submitted the request

- The lower left hand number corresponds to the original reel number. The Alphabetical order (From-To) for the reel will appear directly above this
- The internal arrows progress the reel by one
- The farthest external arrows progress forward or backward by 10 reels.
- The middle arrows forward to either the very first (A) reel or very last reel (Z)
- The lower right hand numbers are the number of individual pages/image (not total transcript records) on that particular reel.
- The first number is the corresponding page number for the image’s location. The second number in the set is the total number of images on that particular reel.
- The arrows on each side of this set of numbers will move forward or backward one image. You can also move forward by selecting a number from the dropdown menu next to the first number set.
- Once you’ve located the student record you are searching for, you can click on the PINK area of the image and a PDF of that page of the student’s record will open.
- If there is more than one page of the student’s record, you will need to go back to the database, progress forward or move backward through the image & then click on the pink area again to open a PDF of each page.
- These pages can then be printed for processing, or cropped if you use the Adobe cropping feature or another image-cropping tool.
- The lower left hand number corresponds to the original reel number. The Alphabetical order (From-To) for the reel will appear directly above this
- Ensure the printed record of the microfilm is legible before sending. Contact the Program Assistant in the Registrar Processing Center to request a clearer copy from Iron Mountain if need be
-
- Adding a Microfilm record to SDB
- Go to SDB screen SRF600 to add a student
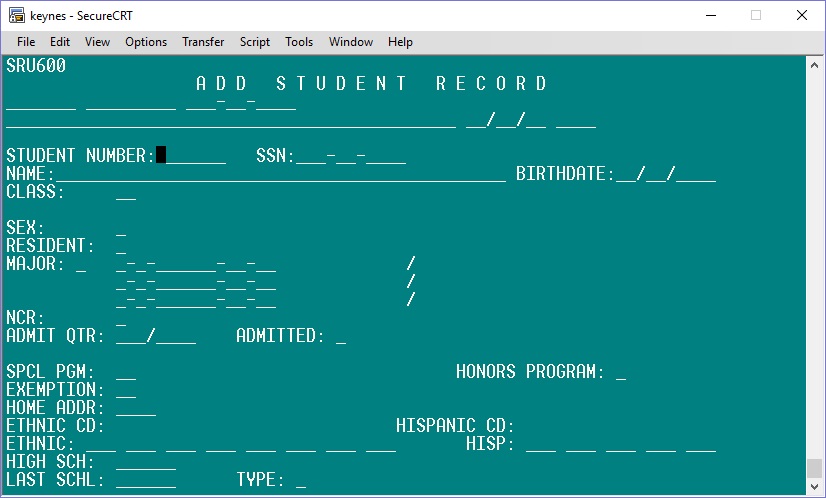
- Input student number from transcript. Also key in SSN if it is on the microfilm only; if it is not, leave as 000-00-000.
- Input NAME: All caps, no space between last and first, example LAST,FIRST MIDDLE then copy the name exactly as it appears on the transcript.
- If a name is crossed out, put the new name that is not crossed out.
- Input BIRTHDATE: On different microfilm years, the DOB is found in different places on the transcript and can be easily confused with date student started. Make sure you’ve entered the DOB.
- Input CLASS: Class needs to be determined from the transcript, choose the MOST RECENT status (example student graduated with Bachelor’s class is 04 or student got undergrad and then Ph.D., class is 08)
- 01-Freshman
- 02-Sophomore
- 03-Junior
- 04-Senior
- 05-Postbacc/5th Year
- 06-Nonmatriculated
- 08-Graduate (including Ph.D.)
- 11-1st year prof (schools such as Dental, Med, Law etc)
- 12-2nd year prof
- 13-3rd year prof
- 14-4th year prof
- Input SEX: M or F. Some microfilm records do not list sex and sometimes it is unclear from the name. In that case, put U for unknown.
- Input the RESIDENT status as marked on the transcript. Contact the Residency Office for assistance, if need be.
- 1- WA State Resident
- 2- Resident Immigrant
- 3- Non-Resident Citizen (other US citizens)
- 4- Non-Resident Immigrant
- 5- Visa Holder (international student)
- 6- Non Citizen other
- Input MAJOR codes. Refer to the degree code list from the Change of Major
- Input their most recent major. Enter an additional major if they earned second degree. For example, a student earned a BA in Psych then did two years of post-bac in Education. Enter 0-C-PSYCH-00-11 for the BA in Psych and then enter 0-H-EDUC-00-00 for the post-bac in Education.

- Figure 1: Example of Psych BA degree code listing
- Enter 0 in the first blank for the Seattle campus.
- Enter the college abbreviation in the second blank.
- Enter the major code in the third blank.
- Enter the degree major pathway in the fourth blank.
- Enter the degree type in the fifth blank.
- Input 1 in the NCR field
- Input ADMIT QTR: Enter the first quarter and year they attended from the transcript. Admitted should be Y if they were matriculated, N if they were non matriculated
- Leave the rest of the page blank and hit send (select enter).
- Possible errors:
- Major codes:
- Some major codes are no longer active that existed in the 60s and 70s, double-check that you entered the correct major code.
- Enter a Y in the first blank after major code on the SDB SRF600 screen and hit send again to override.
- If the override doesn’t work, you need to pick a different code that is similar.
- Display Error reads SAME KEYS ALREADY IN USE displays at the top
- This means that either the exact name, student number, or SSN already exists in the SDB
- Check SSN and student number to see why they are already in the SDB.
- If you are entering a common name such as SMITH,JOHN it will likely display this error, SOME KEYS ALREADY IN USE.
- Type in a fake name such as SMITHSON,JOHN and hit SEND. The system will accept this option. Once the system has accepted this option, go to the SDT905A screen and change the name to the correct name. Note: the SDT905A screen can only be changed once a day.
- Major codes:
- After completing the SDB SRF600 screen, go to SRT311.
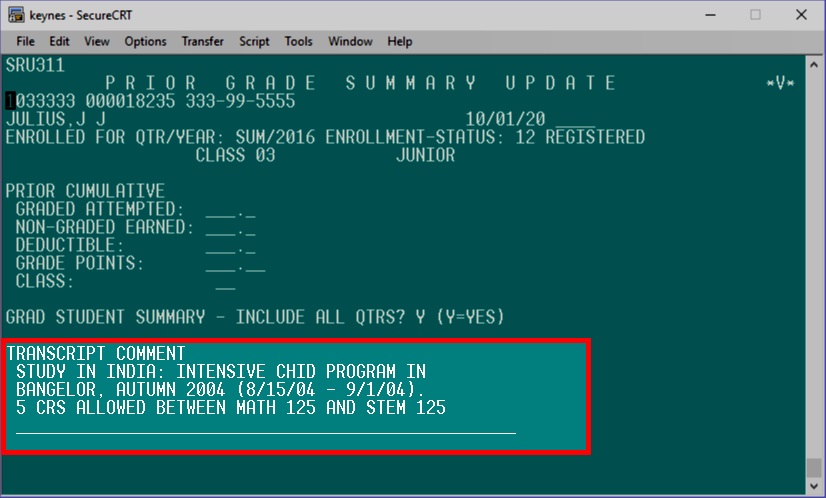
- In the transcript comment, type SEE PRIOR RECORD. Then press send (the enter key).